ورود به حسابــ کاربری
عضویتــ در سایت کلمـه عبور را فراموش کرده اید؟

    آموزش کامل موتور رندر وی ری برای تری دی مکس


    The Ultimate Introduction To V-Ray for 3ds Max

    آموزش کامل موتور رندر وی ری برای تری دی مکس

    این بزرگترین دوره مدرس Kamel Khezri از شرکت MographPlus است که تقریباً چهار ماه در این دوره کار کرده است. در این دوره، با بیش از 18 ساعت یا 1083 دقیقه آموزش های ویدیویی با کیفیت بالا، مدرس یکی از محبوب ترین موتورهای رندر را که VRay از گروه Chaos است را در برنامه 3ds Max بررسی می کند. “ آموزش The Ultimate Introduction To V-Ray for 3ds Max ”، بدون شک، یک دوره ای با بیشترین جزئیات ، دقیق ترین و با کیفیت بالای است که تا کنون در مورد موتور رندر VRay ساخته شده است. این فیلم ها به 9 بخش تقسیم می شوند.


    عناوین اصلی دوره شامل :

    بخش 1: مقدمه
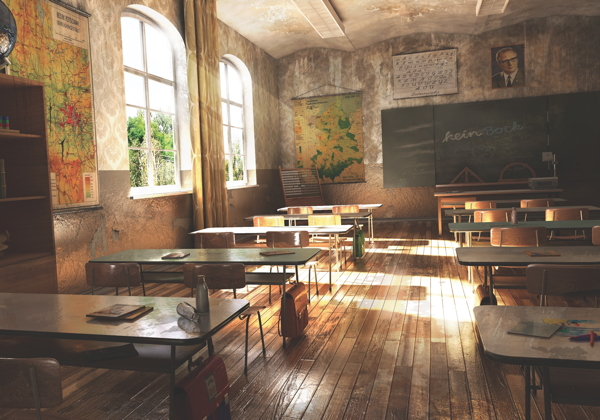
    در بخش اول، مدرس یک مرور کلی از V-Ray را در 3ds max و رابط کاربری آن به شما ارائه می دهد.

    بخش 2: نورپردازی
    بخش دوم، همه چیز در مورد نورپردازی خواهد بود، مدرس از تمام نور های که V-Ray ارائه می دهد عبور می کند، که شامل : نور Area ، مش و نور dome ، نور خورشید و آسمان و نور IES می باشد.

    بخش 3: نورپردازی جهانی
    در بخش سوم، مدرس در مورد نورپردازی جهانی یا روشنایی غیرمستقیم صحبت می کند، ابتدا می آموزید که چگونه پرتوهای نور در دنیای واقعی کار می کنند و چگونه V-Ray با استفاده از روشنایی جهانی رفتار مشابهی را شبیه سازی می کند و سپس شروع به یادگیری در مورد تمام موتورهای GI می کنید که در V-Ray هستند.

    بخش 4: نمونه برداری از تصویر
    بخش چهارم، به هسته اصلی V-Ray اختصاص داده شده است، که نمونه برداری از تصویر است. ابتدا مفهوم اصلی را یاد می گیرید و سپس در مورد نمونه Bucket ، گزینه های DMC جهانی ، فیلترهای تصویر و ماسک رندر یاد می گیرید.

    بخش 5: متریال
    بخش پنجم، همه چیز در مورد متریال V-Ray است و این طولانی ترین بخش از دوره است و شما بیش از 5 ساعت را در 17 درس می گذرانید، مدرس در مورد کلیه متریال و نقشه هایی که V-Ray ارائه کرده است توضیح خواهد داد.
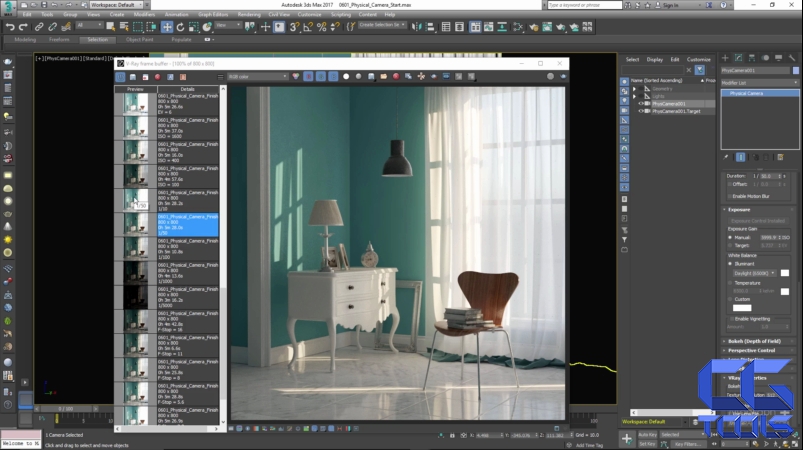
    بخش 6: دوربین
    در بخش بعدی با دوربین و جلوه های دوربین در V-Ray آشنا می شوید، ابتدا فیزیک دوربین را به طور عمیق کاوش می کنید، سپس می آموزید که چگونه می توان جلوه هایی مانند عمق میدان و موشن بلور را تولید و تنظیم کرد.
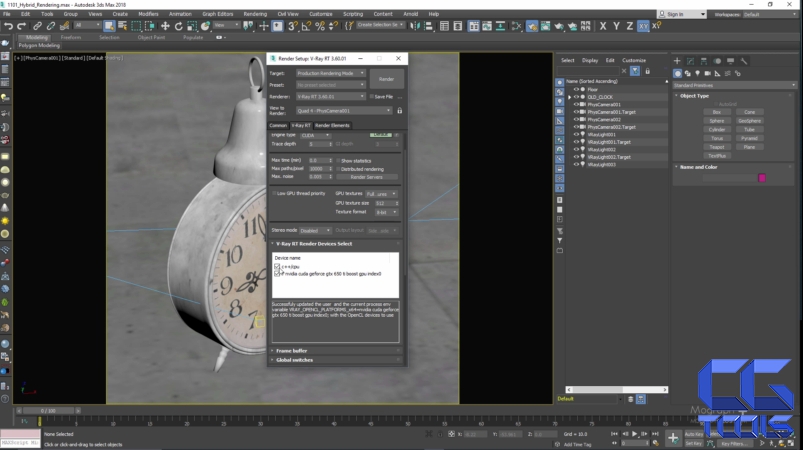
    بخش 7: تنظیمات رندر

    مدرس در بخش بعدی به سراغ تظیمات رندر باقی مانده می رود، ابتدا در مورد Color map و اهمیت آن در ساخت رندر های خود یاد می گیرید. سپس درباره ی بافر فریم مجازی ، سوئیچ های global محیط و نحوه استفاده از آن برای تولید و تنظیم افکت caustics در V-Ray و همچین در مورد تنظیمات فنی و پیشرفته در تنظیمات تب V-Ray بحث می شود.

    بخش 8: هندسه
    در بخش هشتم، درباره هندسه های V-Ray از جمله V-Ray Proxy ، V-Ray Fur ، بخش clipper و هندسه های دیگر یاد می گیرید.

    بخش 9: جو ، محیط و حجم
    در بخش نهم، مدرس در مورد اثرات جوی و حجمی در V-Ray بحث می کند، ابتدا در مورد fig محیط V-Ray می آموزید و مدرس با استفاده از نمونه های بصری تمام گزینه های آن را توضیح می دهد، سپس در مورد Aerial Perspective و Toon Render Effect توضیح می دهد.

    مشاهده توضیحاتــ انگلیسی


    his is our biggest course ever here at MographPlus.com and we spent almost four months working on this course.
    In this course, in more than 18 hours, or 1083 minutes of high quality and academic video tutorials, we explore one of the most popular render engines which is V-Ray from Chaos Group.
    Our “Ultimate Introduction to V-Ray for 3ds Max”, is without a doubt, the most detailed, high quality and academically approached course on V-Ray up to now.

    The videos are categorized into 9 sections,
    Section 1 : Introduction
    In section one, we give you a general overview of V-Ray in 3ds max and its user interface.
    Section 2 : Lighting
    Section two will be all about lighting, we go through all the lights that V-Ray offers. We explore V-Ray Area light, Mesh and dome light, V-Ray sun and sky, IES light, we learn how to use standard 3ds max lights with V-Ray and learn about V-Ray lighting tools like V-Ray Light Lister.

    We literally explain every single option, light and parameter, with practical examples and visualize how they work.

    Section 3 : Global Illumination
    In section three, we talk about Global illumination or indirect lighting, first we learn how light rays work in real world and how V-Ray Simulates the same behavior using global illumination, and then we start learning about all the GI engines that V-Ray has, like Brute force, Irradiance map and light cache. We learn how to use these engines in different lighting scenarios to produce the most realistic lighting possible.
    We go through every single available parameter in the GI tab of V-Ray settings with actual examples. And finally learn how to render flicker-free animations with Global Illumination.

    Section 4 : Image Sampling
    Section four will be dedicated to the very core of V-Ray, which is image sampling, first we learn the basic concept, and then we learn about Bucket and progressive image sampler, Global DMC options, Image filters and Render masks.

    Section 5 : Materials
    Section five is all about V-Ray materials, and this is the longest section of the course and we spend more than 5 hours in 17 lessons, explaining all the materials and maps that V-Ray has to offer.
    We start this section with V-Ray material or VRayMtl and as this is the most important V-Ray material, we spend more than one hour, explaining this material over five lessons.
    Then we talk about Bump and displacement mapping, blend material, two-sided, subsurface scattering, skin, hair and CarPoint materials.
    We learn about V-Ray override and wrapper materials, And finally go through all the remaining materials and maps that are included in V-Ray.

    Section 6 : Camera
    In the next section we learn about Cameras and camera effects in V-Ray, first we Explore Physical camera in depth, then we learn how to produce and adjust effects like Depth of field and motion blur, we learn about different camera types in V-Ray.
    0601_Physical_Camera

    Then we explain stereoscopic 3d rendering and lens effects like bloom and glare in V-Ray, And like other topics, after watching this section, you should be a master of handling your camera in V-Ray, because everything has been explained in extreme details and based on academic approach.

    Section 7 : Render Settings
    In the next section we go through the remaining render settings, first we learn about Color mapping and why it’s so important in forming your final render.Then we talk about V-Ray virtual frame buffer, global switches, environment roll-out and how to produce and adjust caustics effect in V-Ray.We also discuss about more technical and advanced settings in the settings tab of V-Ray.We learn how to use V-Ray RT to interactively render and adjust our scene in real time.
    Then in the longest lesson of the course, we discuss and explain V-Ray Render elements or render passes, we go through all the render elements and learn how to generate different render elements and what each one adds to the final render, then we learn how to composite those render elements using an external application like After Effects.
    And finally in this section we take a look at V-Ray quick settings which allows you to control the overall quality of your render in a very simple and user friendly interface.
    DOF
    NoDOF

    Section 8 : Geometries
    In section eight we learn about V-Ray geometries, including V-Ray Proxy, V-Ray Fur, section clipper and other geometries.

    Section 9 : Atmospheric, Environment and Volumetrics
    In the final section, we discuss Atmospheric and Volumetric effects in V-Ray, first we learn about V-Ray environment fig and explain all of its options using visual examples, then we learn about Aerial Perspective and Toon Render Effect.

    And in the final lesson, we learn about V-Ray Volumetric Grid which allows us to import grid-based cache formats like OpenVDB and render them using V-Ray, first we learn the basics and after that we import several OpenVDB files and try to adjust their shaders and settings to produce


    تصـاویر نمونـه
    برای بزرگنمایی هر عکس بر روی آن کلیک کنید

    ویدئـو پیش نمایش
    این ویدئو نمایش دهنده قسمتی از محتوا میباشد

    دسته بندی محتوا
    .این محتوا شامل دسته بندی های زیر میباشد
    محتوای درخواستی کاربر محتوای ویژه Autodesk 3Ds Max V-Ray
    جعبـه دانلود
    پسورد کلیه فایل ها www.cgtools.ir میباشد.


    فقط اعضای VIP قادر به دیدن لینک ها میباشند.


    برای ارسال نظر، باید در سایت عضو شوید.

وب سایت سی جی تولز با توجه به نیاز گرافیست ها و تری دی کاران به یک مرجع مناسب، احداث گردیده است تا بتواند همواره نیاز کاربران را در این زمینه ارضاء سازد.
خدمات سایت شامل آموزش های سه بعدی، مدل ها، تصاویر و تمامی نیاز های مورد نیاز سه بعدی کاران میباشد.

:::::::: آخـرین نظراتــ کاربران سایتــ :